Wednesday, July 13, 2011

Fabulous Cheap Cabinet Jewelry Holder !

 The hubby and I were out junkin and he found a set of cabinet doors for $1.
I set to work shabbying them up with some white paint, sanded around the edges to make them look chippy, attached a pretty piece of scrapbook paper to the center for color and then a vintage handle to hang the jewelry on.
I finished one, hung it in my pink bathroom adorned with my vintage jewels!
I used an old door handle for the jewel hook.
Attaching this handle was the hardest part because I had a screw issue and it was 110 degrees outside where I was struggling with the drill and screws!
There are a million different ways you could fluff up this cabinet! 
I think some clear shabby knobs would be darling too!
I am thrifty cheap and just used what I had...so total cost was $1.
As I folded towels yesterday, I became flustered as to the terrible shabby condition of my towels!
Not a big deal for me, but I am having company this weekend and holy towels will not do!
I posted about my towel dilema on facebook and was told to check TJ Maxx and Wal-Mart.
I found the prettiest pink towels on sale at TJ Maxx! $1-$5 SCORE!
Of course I chose pink and as I happily jumped in the car my hubby said "is that pink I see " , he had to tease me, but I think he will be happy that he does not have to position the bath towel just right to stay covered YIKES (because of the holes)!
Giggles!
I will be sharing this with the oh so Shabby
Hugs,
 

Monday, July 11, 2011

Shabby Home Photo Session

My sister , Gabby, got an amazing new camera and came over yesterday to do a photo session at my Shabby Home!
Gabby has a natural talent with photography and takes the coolest angles of pictures!
My pretty princess decked out in a vintage pink hat!
  She caught me posing! Giggles!
 She got a new Nikon D3100 Camera! 
 I am in love with the clarity of this camera!
 This camera takes the prettiest photos!
 Click like on her GKR Photography Facebook Page to see more amazing pictures!

Wednesday, July 6, 2011

Vintage Glamour Cases

I have a love affair with painting and fluffing vintage suitcases!
I just finished these two vintage Marilyn Monroe glamour cases and they are by far my favorites!
I will be featuring the young and fabulous Marilyn Monroe in my booth at Cadwell's Flea Market!
I would love to make a couple more for myself to store magazines and other treasures in! 
 These old suitcases are decieving...many times they have been stored well with beautiful interiors, but their outside color makes me want to run for the hills. 
An easy transformation using paint, spray adhesive and a pretty picture!
I brush paint mine with three coats or you can use spray paint.
Use a pretty vintage piece of lace or scarf to wrap the handle in.
 Marilyn is just fabulous and makes for such a glamorous suitcase!
Notice the young Marilyn Monroe on the pink suitcase her eyes are bright as she gets more famous Marilyn's eyes change.
I will be sharing this with the fabulous

Big squishy hugs,


Thursday, June 30, 2011

Old Cabinets and Rose China

I go weak in the knees over rose over old cabinets filled with pretty dishes!

If the item is cheap and has pretty pink roses...I buy it!
Giggle!
I also LOVE old chippy hoosier cabinets! 
My favorite one is in my kitchen! It's an old blue green color, some
might think it is in terrible shape, but I love the shabby chippy!


I'm wondering if I did not have flea market booths...would I be a hoarder?
I also love to find and collect cottage decorating magazines!
Below is my tiny romantic back porch!
 Hope you all have a fun and safe fourth of July!
I will be sharing this with 
 
Big squishy hugs,
 

Friday, June 24, 2011

Shabby July Mantel

Hello my darling friends!
Oooohhh la la summer is here and it's HOT!
This afternoon I have been inside organizing my closets and I decided it was 
high time to change my mantel!
For July I am in the mood for pink (who knew) Giggles!
A bright white birdie house with a fluffy overflowing arrangement of greenery and roses.
Yummy I tell you.
 Everything you see was found at garage sales and flea markets! 
I absolutely love finding pretties for a bargain!
Well my sweeties, I hope you have a beautiful and blessed day!
I will be sharing this with the ever fabulous...

 
Squishy Hugs,
 

Thursday, June 16, 2011

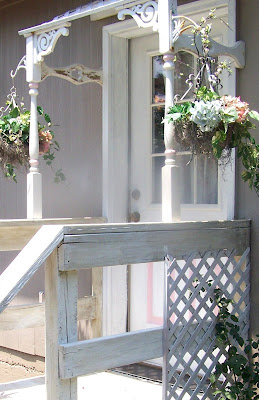
Tiny Chic Porch!

My tiny kitchen back porch is now Chic!
On a shoestring budget, if you can dream it, you can do it!
 I used an outdoor white paint to Shabby up my tiny back porch.
Then I rubbed some sealant and stain over the whole thing.
 I was able to add a climbing rose to the left side...a miracle because my whole backyard is rock.
We built a raised flower bed and garden on one side, using logs and fill dirt from Lowe's.
 HOT hubby helped build the lattice awning using some salvage pieces we had in the garage!
 The posts and Victorian detail added a romantic country flair!
I found plant hangers Cadwell's flea market and painted them white.
I couldn't resist sneaking in some pink detail on the door and posts!
The picture on the left was our before...
The budget is small but my passion for pretty is big!
I can't wait to share more of my garden cottage chic projects with you as they bloom!
This tiny transformation has inspired me to work on all of my yard...it takes patience but I am dreaming and planting slowly.
 I will be sharing this with 
 
Have a lovely and blessed weekend!
Hugs,
 

Tuesday, June 14, 2011

Rusty Tin 4th of July Wreath

For the fourth of July I wanted to add a hit of patriotic colors to the front of my cottage.
This fourth of July Wreath is perfect and so easy to make!
I created it using scraps of stuff I had laying around.
Let's make it:
Rusty Tin
Wire cutters
Red ribbon and scrap fabric in reds
1 med size grapevine wreath
1 small ribbon shaped grapevine wreath
Blue and white paint
String or floral wire
Marker 
Hammer and nail
 *Start by tracing a wonky star on the back of your tin. 
Using wire cutters CAREFULLY cut out 4 small star shapes and one large one.
Hammer a nail into the top of the star and then pull out the nail, this creates a hole to string the stars together.  Paint large star white.
Paint ribbon shaped grapevine wreath blue (I used a pretty blue spray found at Wal-Mart)
String all the stars together and tie them onto the blue wreath with red ribbon. 
Tie fabric scrap around the red ribbon.
Attach to medium size grapevine wreath using string or floral wire.
Get creative!  If you don't have access to rusty tin check your local craft store for foam or pre-cut wooden stars.
I love how these colors create a sense of Patriotism in a Romantic Country style.
This old wagon wheel leans on a tree in front of my house and is so fun to decorate!
Thank you for stopping by my cottage garden and letting me share my inspiration with you!
I will be linking up with
Squishy hugs,


Search This Blog