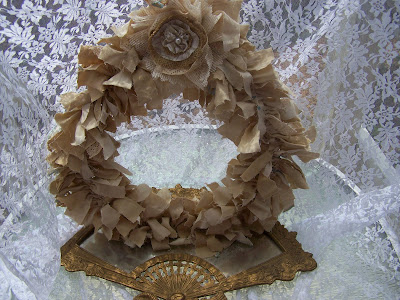
Hello Darling Friends!
With the holidays around the corner this is a fun inexpensive way to
fluff up your Shabby Cottage decor with a cute wreath!
fluff up your Shabby Cottage decor with a cute wreath!


This is sooo easy and fun!
I used some old stained pillowcases and valances that I tea stained.
Supplies:
Wire Hanger
Old fabric or ribbon
Scissors
Glue Gun
Emebellishments (I used a lace and burlap rosette)
Directions:
Step 1~ Bend your wire hanger into a circle
Step 2~Cut alot of (150 or so) 6 inch strips of fabric

Step 4~Bend hanger loop over to make a small circle at top and add rags.
Then using your lace make a pretty fluffy rosette and hot glue to the top.
I added a smaller burlap rosette to the top of center lace piece.
Then using your lace make a pretty fluffy rosette and hot glue to the top.
I added a smaller burlap rosette to the top of center lace piece.


 Hope you love this cheap and easy tutorial!
If you make one let me see!
Send a picture or link to my email at
Oliviasromantichome@gmail.com
Now, my sweet friends you simply have to stop by and say hi to JOY at Markers Miracle and Me
She is having the most fabulous of all tea parties
 in her darling pink home! She is just a true angel and I know ya'll will love her!
I will be sharing this with...
the FABULOUS Beverly at How Sweet the Sound!
Please click on the link below it is a very special giving back link party and ALL you have to do is comment! Amazing stuff is happening for miracle makeovers! This weekend is Charlie's big reveal!!!
http://howsweetthesound.typepad.com/my_weblog/
http://romantichome.blogspot.com/
Hugs,
Olivia


Hi Olivia, used to do this with country fabric when I used to do shows and sold out of them every time. Nice to see someone doing it for today and in tans and creams. Pretty.
ReplyDeleteHugs- Tete
NICE!! I think I should check out my fabric scrap pile!!
ReplyDeleteDeb :)
Very cute Olivia. I made a few using burlap and they sold right away!
ReplyDeletehugs
Sissie
Olivia that wreath is just gorgeous!
ReplyDeleteVery pretty and thrifty wreaths, Olivia. I think using the pieces with the lace trims certainly add to the texture and interest!
ReplyDeleteSooo adorable, Olivia! I might have to make one of these. Thank you for sharing.
ReplyDelete~Shanon
Oh, they look so Victorian, I love it, Olivia! Blessings-Joy
ReplyDeleteBeautiful! I really love the tea stained version...it looks so elegant and vintage! What a fun and lovely, economical craft project! Funny, I was just thinking today about how little crafting I've done lately and I decided it was because it's too nice out to sit inside and craft...and here you are crafting to get out of the heat! It's always fun to see what you're up to!
ReplyDeleteBest Wishes and Blessings,
Amanda
Hi Olivia,
ReplyDeleteLove these!!
I'm making wreath bases from my Wisteria prunings, I'll be doing a raggy finish for them.
Hugs, Angela.
I love these, so glad you posted directions. Have a lovely weekend.
ReplyDeleteCarey
Such a cute wreath and great idea to use a hanger!! It came out darling! :)
ReplyDeleteGreat idea. Thank you for the tutorial!
ReplyDeleteHappy PS!
ReplyDeleteYou are my newest inspiration!
Enjoy your PS and weekend!
Smiles~
C
Happy Pink Saturday! I love your blog. Very cute Shabby Chic projects.
ReplyDeleteCute :)
ReplyDeleteOlivia, I love this. It is so pretty.
ReplyDeleteThank you for participating in this very special Pink Saturday. I hope your visitors will come over to comment and help us to raise more money for the next Miracle Makeover. The good news is that you can leave a comment each day through the 18th, and each comment earns $1.00. So, please come comment again and again.
Wow, what a great idea! even I can do this with stuff I already have here...sign me up! I am a new follower...Pinkim from TrulySimplyPink
ReplyDeleteBeautiful wreath!! And a great tutorial. Thanks so much for sharing.
ReplyDeleteGirl, it turned out great! I love it!
ReplyDeleteThank you for sharing!
Leticia
Just found your blog. Oh this wreath is too cute and sounds easy. I think even I can do it! Thank you for sharing. Love your blog. I'll be back.
ReplyDeletePatti